2019年12月5日 星期四

Silent PC build: ROG Strix 5700XT OC with Kraken G12 + NZXT X62.

  I gather two of my previous post about 5700XT AIO mod in this English post.

  Note: If you're using 5th gen Asetek AIO, and have some drilling or dremel tools already. I suggest not to buy any "GPU AIO bracket" for GPU mounting for 5700XT. Just take the Intel bracket in the AIO, drill proper mounting holes, grab some screw sets and it can work pretty good. Also, you don't need to read this post anymore.
---------------------------------------------------------------------------------------------------------------------------------------------------------------------------------------------

  Since there's no longer overseas business travels, and I also live in somewhere pretty quite, the heat and noise of my laptop MSI GT72 become annoying. Even just playing This War of Mine, the fan runs crazy. So I turns back to desktop PC.

  It's my first time using AMD+AMD setup, the cost of price (CP) is pretty good. But, still noisy while daily using or gaming. Then I give some budget to do a quieter and nearly the same cooling efficient as stock cooler. And all of the setup is base on my daily and gaming scenario, rather then push the hardware into limitation.


  First step, I replace all of the case fans with Corsair ML120s, all from twin packs and no LEDs. According to on of the review site, it's almost has same performance (CFM) with Noctua A12x25. Of course, there's no way to beat Noctua on noise. As the chart blow you can see that ML120 Pro and ML120 Pro RGB has no difference. The difference is the none RGB version, like ML120 from twin pack has higher RPM limitation to 2400 RPM. Which means can provide more airflow if you need.
  When I get these ML fans, it's really quiet. But it may generate some strange noise under some circumstances. No to dig this issue deep in this topic.


   Then I got NZXT X62, Strix LC 240 RGB and Dark Rock Pro 4(DRP4) subsequently. I choose DRP4 for 3800X in the end.

  The last part is my GPU, ROG Strix 5700XT OC. This is the main and hard part in my build, the 5700XT is really hot and the triple fans also loud when gaming. Here's the temps when I play Black Dessert Online(BDO).
  GPU Tweak II set to silent mode, no OC.
  P-Mode, fan RPM 2600. GPU temp 70, hotsot 76, VRAM 74, VRM 69.
  Q-Mode, fan RPM 1600, GPU temp 82, hotsot 100, VRAM 90, VRM 90.
  Manual fan to 500 RPM, GPU temp 100, hotsot 107, VRAM 102, VRM 97.
If you can accept the noise, the cooling performance is quiet good compare to the reference card.

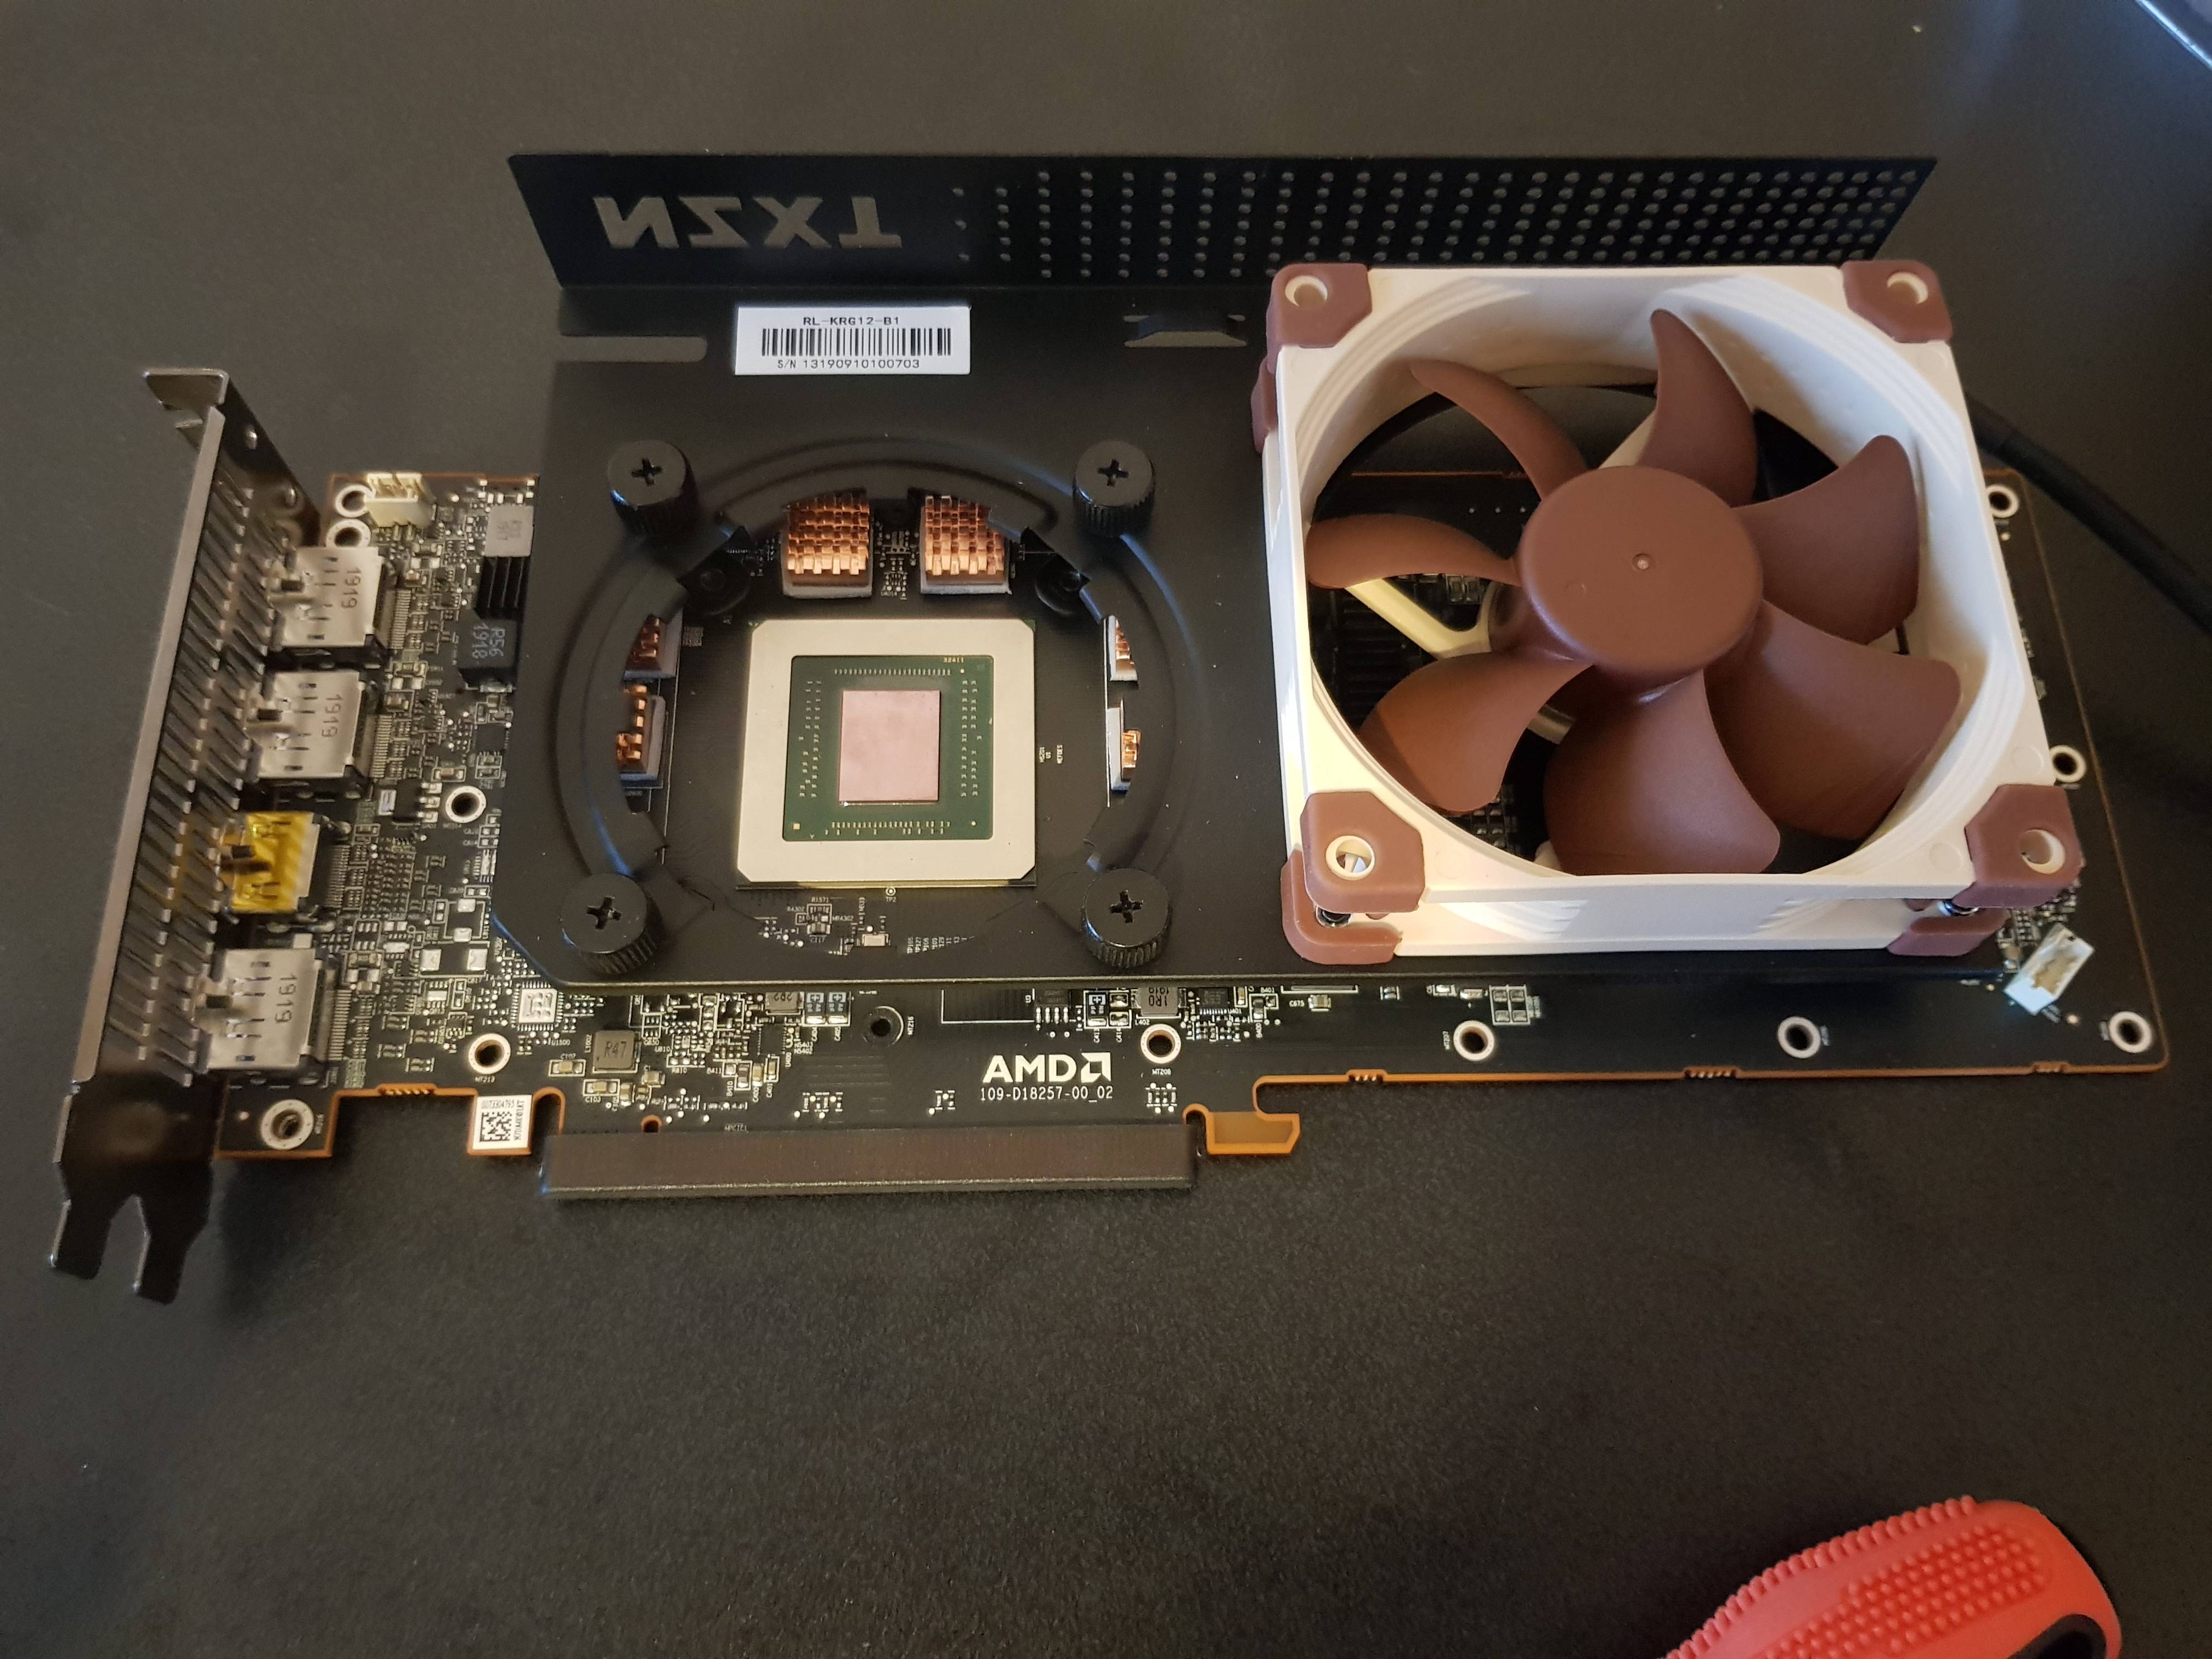
  I do some research that found the X62 can mount on GPU with NZXT G12. Then I mail to the NZXT customer service for asking the compatibility between G12, and 5700XT PCB. Here's the reply:


"Hello,

We have not done any official testing with the 5700xt and the g12 was designed before the existence of the gpu. However, we have seen many users using the g12 on the 5700xt cards just fine.

Although it is not a reference card is it a reference PCB at least? The best option would be to compare the PCB you have to other know working 5700xt PCB's and ensure the mounting holes are the same

Many cards either reference or non reference carry the same mounting specifications

AMD 5700xt
 
"


  Base on this mail and the picture in the attachment, I bought the Kraken G12 immediately before doing any deep dig.
Stick heatsink on VRM and VRAM. Top view, it looks good.


Actually, it's not align.

Then I try to use zip ties, looks well.

Add Noctua A9 and A6 for cooling VRM.

Hold the card with paper strip.
  Then I do a re-research on the threads about 5700XT mod. No one can work it with Kraken G12, bracket modification is required for the alignment issue. It seems that G10 has the same alignment of mounting holes, but still need to modify the bracket for fitting 5th gen Asetek pump (X62, Strix LC 240).

  The craziest one I've seen is one guy drill and enlarge the mounting holes on 5700XT PCB. Actually it's not that dangerous, normally there's no signal trace go to the holding holes. They are connected to ground level.

  Here comes the first test, it failed but pretty worthy for the result. All of the fan are auto controled. Chassis fans and VRM fans by AI SUITE, rad fans and pump by NZXT CAM.
  Idle, rad fans RPM 433, GPU 35,Hotspot 37,VRAM 40,VRM 37.
  BDO,  rad fans RPM 433, GPU 58,Hotspot 109,VRAM 72,VRM 47.

  Wait, what!? The hotspot almost hit the limitation! Then I check what hotspot temp stands for. It's the highest temp on the core, if the sensor can sensor it. It means my pump is not fully touch and press on the core or die, the zip ties are not work fine. If there's no hotspot or Tj, maybe I'll just let it go.

  5700XT PCB has two mounting hole distance, 54x54mm and 64x64mm.
  Kraken G12 AMD bracket provides 53x53mm, on the G12 it self provides 65x65mm(not official).
  There's some other brackets in China market, one of them claim it can use on 52~62mm mounting holes. But again, the 5th gen Asetek pump is too big to perfectly fit every things. About the 5th gen pump, the diameter of copper part is around 55~56mm, the plastic part is 80mm.

  Second test!

The top one is from China market, off-brand bracket, which is smaller. If you would like to use GPU riser, it will be a good choice


The pump of X62 still too big to fit, so I cannot keep the stock frame on my GPU.


In the end, I only use the screw set which comes with the off-brand bracket.


I also want to add copper shim which extend the AIO cooling area to VRAM.


Put some thermal pad and paste, make sure the pump can touch the copper shim.

Then I use G12 again, tiled screw everything and make sure the pressure is enough.
Looks the same as first round test.

  Let's see if this new screws improve the temps.
  These are the temps when idle. G12 is the first test, G12 mod is the second test.
   

  This is the part when I play BDO over 15 mins. You can see the second test is really improve the hotspot temp, down to 83 when the fan and pump runs in silent mode. Still a bit high, but it's already good for me.

  About the VRM, second test gets higher temps. I think that's because the hotspot hit the limitation in first test, the GPU clock frequency may be lower and then cause the VRM is not fully output.


  Here's the FFXV benchmark (3840x2160 High quality, 2560x1440 High quality) and 10 mins Furmark (2560x1440 4xMSAA, I'm lazy to wait...) for comparison.

 The VRAM temps goes extremely high when running Furmark.


  The score of FFXV makes not much improvement than reference card (the 5700 XT board score).

  I think the whole test is already meet my requirements, quieter and nearly the same cooling performance compare to stock cooler.  The only issue I think is the VRAM temp, I don't have any idea how to deal with it. The thing is, it's not that high stress when I'm gaming, I'll just leave it for now. Maybe next time I'll try the full cover GPU watercool block.

2019年11月28日 星期四

ROG Strix 5700 XT OC改裝NZXT X62後續

  上次想用Kraken G12把NZXT X62裝上Strix 5700 XT OC失敗,得到結論就是原廠扣具孔距不合,使用束線帶力道又不夠讓水冷頭貼緊DIE,導致Hotspot溫度降不下來。

  5700 XT的PCB基本上有兩種孔距,54x54和64x64;Kraken G12提供的AMD轉接扣具是53x53,白色本體偏內側的一組是65x65;後來在淘寶上找到一個號稱能兼容52~62孔距的扣具,但實際上因為X62冷頭(底銅直徑約55mm,本體80mm)的大小,依然是無法鎖上去的。另外補充下,如果要保留顯卡中框,Strix PCB上64的孔會被中框擋住。

  研究過網路上有使用AIO水冷玩家,看起來Kraken G10的扣具可以直上64x64,只是有可能要打磨扣住水冷頭的圓環來適應X62這一代的冷頭(冷頭比較肥大)。
  第二種,可以把G12的AMD支架剪斷,然後依照位置在G12本體重鑽適當的孔距。這部分我有想嘗試,不過我拿起IKEA的電鑽試了一下就放棄了...
  第三種是一百趴破保固的方法,就是把PCB 54的孔開成53的孔距,這樣原則上就可以直接套上G12。
  另一種如果有電鑽又不想買額外的扣具的話,可以把水冷內附的Intel支架拿來鑽上對應孔距的孔,也可以直接鎖到顯卡上。

不鏽鋼色是淘寶的扣具,確實可以鎖上X62,體積也較小。
白色是NZXT的扣具,是磨砂質感的噴漆,體積很大,如過用直立顯卡可能會和體積大的CPU風扇卡到。

本來是想試試看能不能保留中框,不過X62冷頭太大,螺絲和墊片還是鎖不上去53x53的孔。

結果只拿了這組螺絲來用。

這邊想順便試試看加銅片在VRAM上的散熱效果,先用賽璐璐片畫出大概的形狀。

VRAM用原廠的散熱矽膠,其他則是用另外買的0.5mm和1mm散熱矽膠。

疊上銅片和散熱塊,Core外圍會讓冷頭接觸的地方也塗上散熱膏。
  最後一樣鎖回G12上面,不過PCB是64的孔距,而G12是65,依然是斜插上去,不過有加上墊片和彈簧可以稍微增加壓力。原廠背板則可以用M3螺絲和螺母鎖上,不用依靠中框。順帶一提,這個原廠金屬背板在PCB中間有散熱矽膠,還是有點散熱效果,如果你在燒機過程中去摸摸看就知道,很燙...

完成後,看起來跟上次一模模一樣樣 XDD

  下面分享一點數據,因為事前也沒想到一些數據蒐集的問題,整體而言並不是很精準的測試。這次改完後的新增數據都是GPU-Z Peak值。


   這邊提供幾個待機溫度,包含前次改裝的G12,以及這次改裝後剛開機及跑完一次FFXV Benchmark過五分鐘後的溫度。原廠散熱器則是玩遊戲後進待機的溫度,可以和最後一組數據比對。


  接著是玩黑沙時的溫度,基本上這次改裝的大方向就是在遊戲時可以安靜但盡量維持原廠散熱效果的目的。可以看到前次G12的Hotspot溫度接近天花板的109度,降到這次在風扇靜音模式下最高83度,此外其他的溫度數據都比原廠散熱的狀況好一點點。

  而前一次改裝的VRM溫度會這麼低,估計是GPU Hotspot過高已經自動降頻,沒有消耗更高的功耗。


  接著跑了FFXV Bemchmark和10分鐘Furmark(有點懶...),這裡的數據都是這次改玩水冷後才想到要跑得,所以無法前後比對。GPU TWEAK設定OC是2.15Ghz,不過實際跑出來最高在2.1Ghz。

  這幾個測試的VRAM雖然都穩定在1.75Ghz,比較可怕的是Furmark VRAM溫度,最高衝到了98度...大概是水冷頭接觸銅片的面積和壓力還是不夠,主要都還是仰賴被動散熱和兩顆小風扇掃到的風。


  這邊比了一下FFXV的跑分,看起來差異是不大,僅提供做為基準線。


  整體來說我認為是有達到當時預設的目的,遊戲中能安靜又達到接近原廠散熱效果。VRAM的部分我想遊戲並不會無時無刻都處在Furmark這種高負載情境下,暫時是不用太擔心。

  目前手上還沒把東西補齊,也還在考慮要不要把剛入手一個月的ML系列風扇換掉,等都換完了再更新一次文章,這台主機暫時就不會有甚麼大變動了。

2019年11月15日 星期五

安靜的散熱 與 ROG Strix 5700XT OC 上NZXT一體式水冷

  目前工作不再需要出差,也換到一個夜深人靜就安靜到不行的房子後,GT72的效能和散熱已經無法滿足了,連開著This War of Mine散熱器都能起飛,鍵盤區也是很熱,在夏天實在有點受不了,所以回到多年未碰的桌電領域。

  在朋友推坑下第一次聞香買了A+A,效能和CP值上真的不錯,但,就是這個但,真的是各種吵。畢竟電腦不是要拿來持續跑分、挖礦或做些極限運算,下面情境都是以個人日常使用下,以達到原廠散熱器散熱效果但更安靜的配置。

  首先機殼風扇通通換成Corsair的ML120,然後考慮CPU和GPU的散熱組合,是要兩顆一體式或是塔散加一體式,現況是入手了be Quite的Dark Rock Pro4和NZXT X62來做比對;在日常使用下大約低了5到10度,而DRP4相對安靜,實際上兩者的噪音和溫度都是在可接受的範圍內。X62自帶的風扇和Corsai ML140相比真的是滿大聲的,好在水冷的風扇通常不用把轉速拉太高,就能應付日常使用。

  最後要處理的則是GPU,入手之後才注意到5700XT即便是非公版卡風扇噪音還是很明顯。
在靜音模式下開黑沙,風扇轉速2600RPM,GPU溫度大約落在68到70,Hotspot 76,VRAM 74,VRM 69。
靜音模式下開啟Q-BIOS後風扇會降到1600RPM,GPU 82,Hotspot 100,VRAM 90,VRM 90。
如果降到最能接受的噪音,約500RPM,GPU 100,Hotspot 107,VRAM 102,VRM 97。這真的是很可怕的溫度,而且在GPU大約升到95度時,主機就會飄出些怪味,真的是有點可怕...

  5700系列,AMD官方曾針對GPU和Hotspot溫度提出說明,關於AMD如何置入溫度感測陣列以準確呈現GPU核心溫度,其中有一段似乎經常被網友和媒體引述的內容是這麼說的:
"Paired with this array of sensors is the ability to identify the ‘hotspot’ across the GPU die. Instead of setting a conservative, ‘worst case’ throttling temperature for the entire die, the RadeonTM RX 5700 series GPUs will continue to opportunistically and aggressively ramp clocks until any one of the many available sensors hits the ‘hotspot’ or ‘Junction’ temperature of 110 degrees Celsius. Operating at up to 110C Junction Temperature during typical gaming usage is expected and within spec. This enables the RadeonTM RX 5700 series GPUs to offer much higher performance and clocks out of the box, while maintaining acoustic and reliability targets."
  我認為這整段內容很容易被過度解讀,而這篇文章的作者在用字上也是在吊人胃口。合理的觀點應該是,官方FW在GPU溫度、Hotspot或是GPU的頻率上限其中一項被頂到天花板之前,Clock可以被Boost上去。以溫控來說,GPU會一直Boost clock,直到GPU溫度或Hotspot達到極限,後就會停在這個Clock或降頻,以各種評測來看,公版給予的上限應該就是110度,非公版則是可以控在70~80度。但80度也還沒頂到110度,所以Clock會繼續被Boost上去嗎? 當然不可能,架構和Core能做到的也就被物理限制在那裡,而溫度只不過是被效率較高的散熱器控制住。

  接著計畫中的下一步就是將X62裝到顯卡上,在束線帶和Kraken G12中考量許久,最後還是在淘寶上買了G12和幾個散熱片。在購買之前,我有詢問過NZXT官方人員有關G12和5700 XT的相容性,官方的回覆如下:
"Hello,

We have not done any official testing with the 5700xt and the g12 was designed before the existence of the gpu. However, we have seen many users using the g12 on the 5700xt cards just fine.

Although it is not a reference card is it a reference PCB at least? The best option would be to compare the PCB you have to other know working 5700xt PCB's and ensure the mounting holes are the same

Many cards either reference or non reference carry the same mounting specifications

AMD 5700xt
 
"

  就是那句"However, we have seen many users using the g12 on the 5700xt cards just fine.",而且回信還附圖,讓我鬆懈了,當時我也只有查到有人確實將G12裝到5700XT的公版上,而OEM廠商一般也不會去修改mounting的孔距。   收到G12後就馬上開始動工,照片上看起來很OK~

殊不知,其實底下長這樣,螺絲孔根本就對不到......


 這時候只好再請出束線帶,勉強將另外兩個孔位固定住


加上一顆A9和一顆A6吹VRM的部分,沒了中框,即便顯卡有背板還是垂得很厲害,請出高科技紙吸管來支撐。


  接著試試實用上的狀況,以下VRM風扇都以AI SUITE智能控制(認CPU溫度)。
待機時,NZXT原廠冷排風扇433RPM,GPU 35,Hotspot 37,VRAM 40,VRM 37。
接著開BDO,風扇維持433RPM,GPU 58,Hotspot 109,VRAM 72,VRM 47。
What? Hotspot高達109度,而其他數據看起來也很合理,VRAM只有上散熱片,VRM還有兩顆風扇在吹溫度相對低很多,和ROG原廠風扇比起來根本是安靜到不行,但,就是那個但,Hotspot溫度高成這樣。經過一些資料比對後才注意到,那些能夠裝的上去的網友,如果不是硬裝(還是會跟我一樣沒裝好),不然就是動過一些手腳,其中一篇的使用者甚至在公版5700 XT的PCB上直接開孔...

  這邊先補充上有關VRM風扇散熱的狀況,不少網友在提到要幫顯卡上一體式水冷或使用Kraken G10/G12時都會考慮VRAM、VRM的散熱問題。以下數據GPU溫度沒截到,就先專注在VRM溫度上,冷排和上面一樣維持443RPM。
待機時,A6、A9靜止(0RPM),Hotspot 48,VRAM 48,VRM 34。
開BDO,A6、A9靜止(0RPM),Hotspot 110,VRAM 74,VRM 53。
開BDO,A6、A9全速轉(其中一顆2900RPM),Hotspot 110,VRAM 72,VRM 48。
可以看到VRAM略略的被兩顆風扇的風掃到而降溫(和上面測試相同為72度),而VRM在全轉和靜止下差了五度。

  後來參考了幾篇顯卡上AIO有Hotspot溫度過高問題的文章,看來是AMD Vega系列的卡有這個狀況,估計是Vega系列之後才加入了溫度感測器陣列,所以散熱片或冷頭如果貼合不全造成這個高溫的狀況比較容易被看到。真正造成Vega系列有這個問題的狀況,主要出在Vega的Core上有多個Die,而散熱膏塗布的量通常不會多到滲入縫中,只會在這幾顆Die的表面上,導致Die與Die中間的溫度感測器沒確實吃到散熱膏,熱導不出去而偵測到高溫,而非誤測。國外的玩家實測後有提出兩個很類似的觀點以改善Hotspot溫度過高的問題,大量的散熱膏和用力鎖緊冷頭。
"Plenty of thermal paste. Plenty of pressure."
"Be generous on your paste. Be generous with the torque."
以下附上Die和溫度感測器的示意圖,由於找不到Vega 64的溫度感測器示意圖,故附上Radeon VII做為參考。
「vega die」的圖片搜尋結果
Vega 64的Core
「AMD Radeon VII die」的圖片搜尋結果
Radeon VII Core
「AMD Radeon VII hbm sensor」的圖片搜尋結果
Radeon VII 溫度感測器位置
  看到這邊我才想到是不是束線帶拉不夠緊,回去重拉一次後還是一樣Hotspot溫度過高,甚至高到111度,最後我用手使勁壓住冷頭和PCB,Hotspot瞬間掉到80度。目前就先繼續掛著冷頭,不開遊戲,然後一邊找看看其他AIO的解套方案了... 至少目前看來溫度感測器陣列是有實用的價值,但散熱片或冷頭與Die的貼合要非常注意,Hotspot達到110度也絕對不是一個可預期或接受的狀況。


2019年9月15日 星期日

DIY體驗式頭戴顯示器HMD

  先做個提醒,這個DIY只有HMD的部分,看起來很像VR或AR,但是因為沒有額外的感測器去偵測使用者動作,基本上就是個純頭顯! 這次來DIY組裝的頭戴顯示器(以下簡稱HMD)適合以下的人嘗試,
1. 有智慧型手機,不論是iOS或Android系統都可以。
2. 想嘗試HMD、VR或AR,但種種因素沒有購入的嚐鮮玩家。
3. 有擷取盒的話可以用在家機上。
  再次強調,這是純HMD,而HMD也是VR、AR裡基礎的設備之一,可以讓使用者體驗看看戴上HMD大概可以帶來甚麼樣的體驗。

  下面分三個情境來體驗,而其中必備的另一個材料是VR Box。買之前要記得注意下手機尺寸有沒有相容,我挑的這款有支援到6.3"螢幕,Galaxy Note 8還放得下。

  第一種情境,就是很單純的將手機當成VR使用,只要APP(MX Player VR或是Xorn hub之類的)有使用到手機裡的感測器,基本上就可以體驗到所謂的VR,而這也是VR Box主要的工作,這邊就不多說明。

  第二種情境,就是將HMD當作電腦顯示器來用,可以用有線或無線的方式完成。
先介紹有線的方式,我是使用Android手機和Win10,iOS的使用者可以Google下Duet Display的用法,原理上都是一樣的。
  首先手機上安裝Splashtop Wired Xdisplay,PC端則是安裝Adb driver、Splashtop Wired Xdisplay PC端和OBS。然後測試手機用USB線連到電腦時能不能被認成延伸螢幕,在Windows下設成延伸螢幕後,同時確認可以支援的螢幕解析度為何。
  接著到OBS裡面進行設定,第一步先新增一個場景,這裡命名成VR test。
  第二步,進入設定->影像,將畫布設定成跟延伸螢幕解析度一樣的大小,這樣理論上會比較好tune畫面,我這裡偷懶就設1920x1080了。
  第三步在來源裡新增兩個顯示器擷取,記得這兩個是要選同一個螢幕。

  第四步,將兩個顯示器擷取調整成相同大小,並排塞入畫布當中,就像下圖一樣。

  最後,將這個畫面全螢幕投影到延伸螢幕,也就是連線的手機上面。然後手機裝上VR Box,開始調整VR Box上的瞳距和焦距,如果都調整不出來,那就調整看看OBS裡面螢幕擷取的位置或大小,基本上就沒問題了。

  接下來介紹無線的方式,使用這個方式的使用者在電腦端本身要有雙螢幕才有辦法操作。
  假設有螢幕1和螢幕2,你想操作的是螢幕1,並將畫面投影在螢幕2上面。OBS上畫布大小就改成螢幕2的解析度,兩個顯示器擷取都設定為螢幕1,然後將OBS畫布全螢幕投影投到螢幕2上面。然後在手機端使用Chrome遠端桌面或是Teamviewer,將手機畫面調整到螢幕2,並將畫面填滿手機螢幕,然後就可以看到在VR Box裡面看到一樣的效果。
  Android上有另一個APP,Space Desk是可以用區網Wifi來將手機當作延伸螢幕,不過實際使用上真的延遲很嚴重,這裡完全不推薦這種連線方式。

  最後一個情境,就是拿來玩家機,不過這個成本就比較高,首先你必須要有個擷取盒將家機影像input到電腦端才行,好處就是不論哪台家機(PS4、XBox、NS),只要有影像輸出功能的主機都可以使用,所以NS Lite就沒辦法這樣玩了。我使用的擷取盒是GC550,再來只要把上面OBS的設定,從顯示器擷取改成視訊裝置擷取,再用有線或無線的方式投影到手機上就可以囉,這個情境下無線連接就不需要用到雙螢幕了。
  至於手機也可以用的免驅動USB擷取卡我就不確定是不是可以做到一樣的事情,這邊留給有用手機直播的大大們來試試看吧

  基本上HMD和VR的顯示器都是用同樣的原理,將要看的畫面放在兩個完全一樣大小的螢幕,或者在一個螢幕上並排顯示兩個相同的畫面,然後通過放大鏡或是改良過的專用透鏡顯示給使用者看,而VR則是多加了畫面變形和許多sensor讓使用者有沉浸感。

這就是用無線方式連線的配置,右邊螢幕設定OBS,投影到左邊螢幕。

手機上再用Chrome遠端看左邊螢幕

遠遠看當然是很模糊啦。

正常來說,對焦完可以看到的左眼影像。

右眼的影像。


  接著我們來總結一下體下HMD的感受:
1. 使用Splashtop Wired Xdisplay還滿穩的,售價也不貴,還有無限次(應該是?)免費試用十分鐘給你考慮。
2. 用Chrome遠端桌面也滿穩的,缺點有點多... 第一,APP版沒辦法PC版一樣指定只顯示某個螢幕,要手動去縮放螢幕大小。第二,螢幕還是會跟著系統螢幕休眠時間走,最長十分鐘到了就會關螢幕,不過這個好像在Android開發者模式下可以強制螢幕常亮。第三個缺點比較無解,我用了大概十幾分鐘,打MR蒼火龍打到一半就顯示手機過熱強制關螢幕了 QAQ,第一次遇到Note 8過熱。
3. 用TeamViewer,雖然可以指定顯示螢幕,不過default連線設定連看個Youtube都會Lag,這個就要再研究下TeamViewver的設定。

  從這邊也可以衡量看看,市售的HMD或VR可能會給使用者甚麼樣的體驗,像是HMZ-T3Z提供720P+無線顯示,上面的做法就有辦到一樣的事情。PS VR如果沒有搭配VR專用遊戲,和這個方案相比,其實大同小異,只是PS VR會將螢幕模擬成定點,比較符合現實環境下看著螢幕的情境。如果沒辦法砸下成本玩高階VR或是沒有配套的軟體、遊戲,這裡提供的做法我認為已經可以滿足大部分使用者的體驗或需求了。